
Create a Digital Story to Bring Your Image to Life!
The Images team, in collaboration with Chris Thomson (Jisc) have developed a training programme and online resources to enable you to create your own digital story to share your story with the public visiting the exhibition.
What’s a digital story?
Quite simply it’s a personal story that you produce yourself using digital tools. It includes:
- Recorded voiceover of written story
- Still images enhanced with subtle effects
- Text
- Optional music and sound effects
- Minimal use of video
- Credits
A digital story works best when focussed on something specific – a single event, object etc. Trying to tell the whole story of your research makes it harder for the audience to relate to the story. It’s also harder to write.
So short stories (2-3 minutes) work best. This limits the information you can include, so you need to be economical and focussed, sticking to the point (a digital story can be thought of as more of a postcard, or window into something larger, than a novel).
You can listen to our Project Coordinator, Rachel Clark, describing the benefits and uses of digital storytelling here with digital solutions organisation, Jisc.
Here are some examples:
Scientific Research - Dear John
Public Engagement - Pi Day Live
Reflection on Research – Chris’ Story
Wondering how to get started?
Check out the Images story builder website for hints and tips.
Happy with your story?
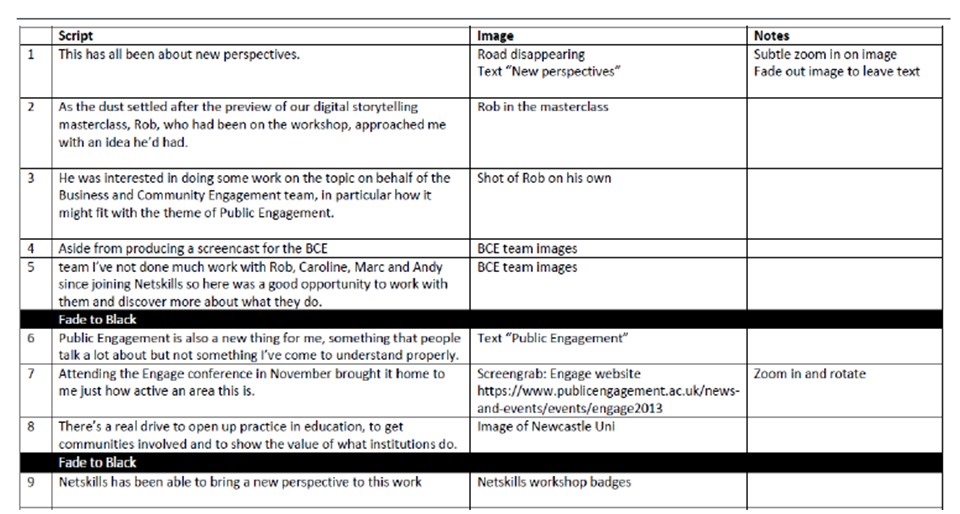
The next step of the process is converting you story to a storyboard. The easiest way to do this is to create a spreadsheet with column titles:
- Script (What you hear)
- Image (What you see)
- Optional - Sound (special effect or soundtrack)
- Credits (see section below for more details)
Credits
Finding and using images
To capture exactly what you want in an image for your story, consider setting up and taking the pictures yourself with help from friends or family. You need to credit the photographer as the image owner and have their permission to use the image for the purpose of your video. This is your responsibility and the Images team will check you have appropriate permissions.
Images in the public domain don’t necessarily mean you can use them for free. Familiarise yourself with Creative Commons Licenses and look out for the codes on image websites such as Flikr and Google Images to ensure you credit the owner by listing:
- Creator
- Image Title
- URL
- Type of license
![]()
![]() CC0 Public Domain
CC0 Public Domain
We recommend you start with these sites:
- Find a photo http://finda.photo/
- Compfight (Flickr) http://compfight.com/
- Wikimedia Commons http://commons.wikimedia.org/
- Free Images http://freeimages.com
- Google image search (advanced) https://www.google.co.uk/advanced_image_search
(change the last search box “Usage Rights” to Free to use or share)
Finding and using sound
Often, digital stories can be powerful in their simplicity, the viewer focussing on the power of your voice. If you wish to add sound effects or a backing track then you need to source sound files that are free to use for this purpose. You can’t use a top 40 hit or your favourite band without their permission!
We recommend you start with these sites:
If you use any tracks or sound effects, you need to credit them in the same way as the images with Creator; Track Title; URL; Type of License.
To learn more about free and legal music download read this article.
Recording your voice over
Recording devices are available from Information Services, but often, the quality you can get from a smartphone is good enough. The location you record your voice over should be quiet, with no low level noise such as clock ticking, air conditioning or street noise, for example (this is harder than you might think!). If you’re a student, the library has soundproof meeting rooms that you can book for a 2 hour slot. If you’re a member of staff you can book Collins Court Senate for 30 minutes at a time through room bookings, it has no background noise.
Creating your video
The Images team recommend We Video, an online video building software that has excellent video tutorials to get you started. You can create a personal log in free of charge as a personal user. Once you’ve done that contact the Images team to be added to our institutional license to enable access to shared files and resources, and create videos without the watermark.
PowerPoint can be used to create short animations using simple effects, which can then be saved as a movie and imported into your We Video storyboard. Learn more about animation effects in PowerPoint here.
Prezi is also a good site for creating simple but effective graphic animation sequences.
There are also some great, freeware applications which enable you to create simple animations:
Moovly: https://www.moovly.com/
Create up to ten minutes of footage free. There are many online animation apps with free subscriptions (limited features) but this is one of the few that allows you to download your animation on the free plan.
GIFMaker: http://gifmaker.me/
Create animated GIFs to import to your We Video storyboard.
For specific help and advice or a copy of the training materials the Images Team are here to support you. Email us with any questions you have!